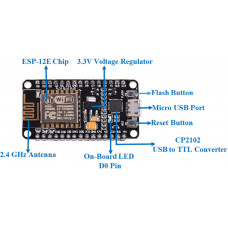
NodeMCU is an open-source Lua based firmware and development board specially targeted for IoT based Applications. It includes firmware that runs on the ESP8266 Wi-Fi SoC from Espressif Systems, and hardware which is based on the ESP-12 module.
NodeMCU ESP8266 Specifications & Features
- Microcontroller: Tensilica 32-bit RISC CPU Xtensa LX106
- Operating Voltage: 3.3V
- Input Voltage: 7-12V
- Digital I/O Pins (DIO): 16
- Analog Input Pins (ADC): 1
- UARTs: 1
- SPIs: 1
- I2Cs: 1
- Flash Memory: 4 MB
- SRAM: 64 KB
- Clock Speed: 80 MHz
- USB-TTL based on CP2102 is included onboard, Enabling Plug n Play
- PCB Antenna
- Small Sized module to fit smartly inside your IoT projects
Programming NodeMCU ESP8266 with Arduino IDE
The NodeMCU Development Board can be easily programmed with Arduino IDE since it is easy to use.
Programming NodeMCU with the Arduino IDE will hardly take 5-10 minutes. All you need is the Arduino IDE, a USB cable and the NodeMCU board itself. You can check this Getting Started Tutorial for NodeMCU to prepare your Arduino IDE for NodeMCU.
Uploading your first program
Once Arduino IDE is installed on the computer, connect the board with the computer using the USB cable. Now open the Arduino IDE and choose the correct board by selecting Tools>Boards>NodeMCU1.0 (ESP-12E Module), and choose the correct Port by selecting Tools>Port. To get it started with the NodeMCU board and blink the built-in LED, load the example code by selecting Files>Examples>Basics>Blink. Once the example code is loaded into your IDE, click on the ‘upload’ button given on the top bar. Once the upload is finished, you should see the built-in LED of the board blinking.
NodeMCU ESP8266
- Product Code: NODEMCU
- Availability: In Stock
-
Rs475.00
Tags: NodeMCU ESP8266


